


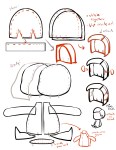
Some of you guys wanted to know the pattern on the Hux plush I’ve been working on, so here it is! Hes mostly made to look good sitting down, hes not really a standing up sorta guy. I’ve included the pattern for the body separate from the hair/face in case you want to modify it for different character. The pattern should be full size when printed on letter paper
(8.5 in.x 11 in.)
to make the size shown here. I’ll try making clothes later!
Supplies:
- Microfiber (I used a cleaning cloth from a dollar store that was just the right shade as you can see in the top left, one was enough for this size) in cream and orange (tho i used a orange microfiber socks I found at the same dollar store).
- Felt for eyes
- Embroidery Thread for details (eyebrows, mouth, and sideburns)
- Soft pink pastel for blush (oil pastel will not work)
- Needle, thread, scissors (white blends well with the skin, not so well with his hair)
Notes:
- Make all the body parts separate before putting them together, except for the main body/tummy, since you’ll be inserting arms/legs before you close it.
- Always put the right sides together so the stitching is invisible!
The ears are attached to the hair (right sides still stands, hide those ugly edges!) so you have more control over placement, and pinned back into place.
- The hair is attached to the head in a wig-like way to preserve the head shape, and gives chance to check that it looks good. Hair is added after its stuffed.
- Blush before you add the eyes.
- The face is better off stitched into place after you stuff it so you can avoid warping. The sideburns are added after the hair.
- Arms and ears don’t need stuffing at this size with fabric this thick: legs do.
- Try to use scissors that have only been used for fabric; scissors that have been used with paper go dull quickly and you’ll have a rough time cutting microfiber (or any fabric) with it. Have scissors dedicated for different materials.
- Add beans or weight to the bottom/butt so he sits easily
- Have fun!
